
Table of Contents
- Why Proper Canvas Framing Matters
- Best Tools for Framing Canvas Art
- Measuring Your Canvas and Choosing Frame Dimensions
- Floater Frame vs Standard Frame: Which Works for Your Canvas
- Step-by-Step Canvas Framing Instructions
- How to Hang Canvas Without Nails: Secure Mounting Options
- Conservation and Archival Standards for Long-Lasting Canvas
- Common Framing Mistakes to Avoid
Last Updated: August 30, 2026
Why Proper Canvas Framing Matters
Framing canvas art properly transforms a beautiful piece into a gallery-quality focal point. Poor framing leads to canvas sagging, color fading from UV exposure, and structural damage that's often irreversible. Proper framing preserves archival quality while creating the polished look that elevates your space. This guide walks you through every decision you'll face when framing canvas art, from choosing between floater and standard frames to mastering the technical details that separate amateur results from professional ones.
Best Tools for Framing Canvas Art
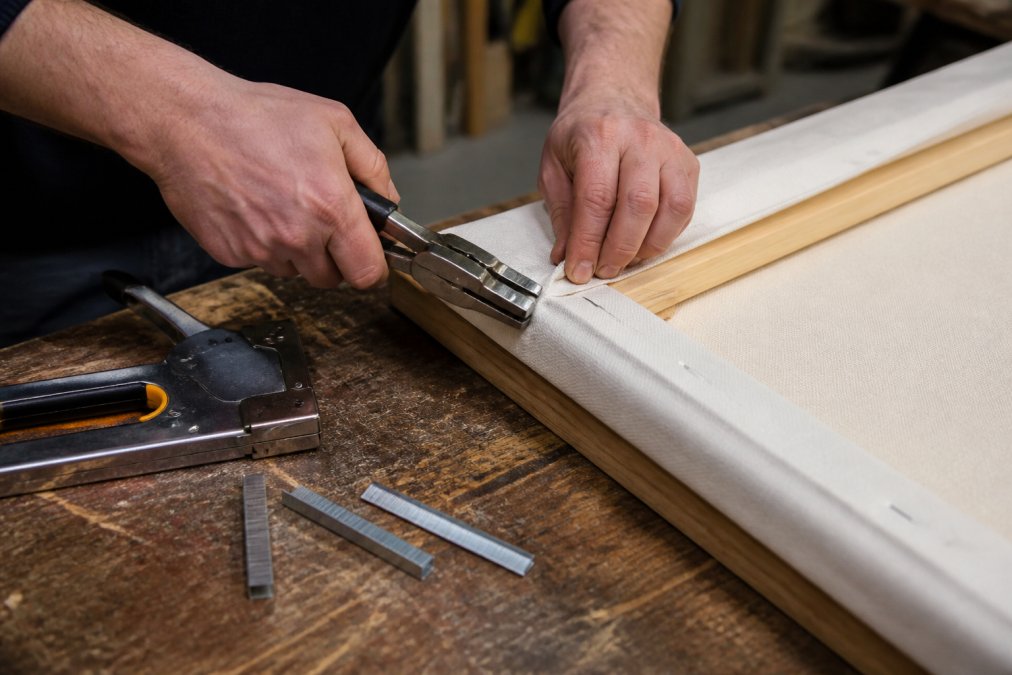
A staple gun is non-negotiable. Pneumatic staple guns work faster, but manual versions give better control and are sufficient for most home projects. Canvas pliers with a curved jaw grip canvas without tearing it; regular pliers damage the fabric. A miter saw handles frame corners with precision, ensuring accurate 45-degree angles. You'll also need a measuring tape (at least 16 feet), carpenter's square, quality wood glue, offset clips for floater frames, d-rings and picture wire for hanging hardware, and acid-free backing board.
Additional essentials include a dust cover (acid-free paper or fabric) and screws appropriate to your wall type with corresponding anchors. Work gloves and safety glasses protect you when using power tools.
Measuring Your Canvas and Choosing Frame Dimensions
Accurate measurement prevents expensive mistakes. Measure your canvas width, height, and depth. Canvas depth matters more than most people realize; it determines which frame style works and how far the frame extends from your wall.
Canvas comes in standard depths: 0.75 inches (thin stretcher bars), 1.5 inches (standard gallery wrap), and 2 inches (deep profile gallery wrap). Thicker canvases require floater frames with deeper rabbets. Add half an inch to your canvas measurements for the frame opening if using a standard frame. For floater frames, the opening should match your canvas dimensions precisely.
Write down three measurements: canvas width, canvas height, and canvas depth. Verify twice before ordering materials; a single measurement error cascades through the entire project.
Floater Frame vs Standard Frame: Which Works for Your Canvas
Floating Frame Benefits and Installation
A floater frame creates visual separation between the canvas and frame, with the canvas appearing to float within the opening. This approach works beautifully with deep-profile gallery wraps and creates a modern, gallery-like appearance. The floating effect draws attention to the artwork rather than the frame, and it's reversible, you can remove the canvas without damaging it, making floater frames ideal for rentals or frequent moves.
The trade-off is cost and complexity. Floater frames are more expensive and require precise measurements. If your canvas is thin (under 1 inch), a floater frame may not work.
Traditional Frame Assembly and Canvas Mounting
A standard frame wraps around the canvas perimeter, with the frame edge meeting the canvas edge at the front. This approach works with any canvas depth and is more forgiving of slight measurement variations. Installation involves stretching the canvas over the frame's back and securing it with staples, working from the center of each side outward to maintain even tension.
Standard frames are more affordable than floater frames and offer greater flexibility in style and finish. The trade-off is that stapling creates permanent attachment; you can't remove the canvas without damaging it. The quality of the final result depends on even tension. Uneven stapling creates visible wrinkles or sagging.
Step-by-Step Canvas Framing Instructions
Step 1: Prepare Your Workspace and Materials
Clear a flat, level surface at least as large as your frame. Inspect your canvas for damage before framing, check for loose threads, tears, or areas where the canvas separated from the stretcher bars. Test your staple gun with scrap material and verify your frame opening dimensions against your canvas measurements one final time.
Step 2: Stretch and Secure Rolled Canvas
If your canvas arrives rolled, let it rest flat for 24 hours before framing. Position the canvas face-down on your work surface and place the frame on top, centered. Using canvas pliers, pull one edge of the canvas over the frame's inner edge and insert a staple at the center of that edge.
Move to the opposite side, pull with even tension, and staple at the center. Repeat for the remaining two sides. Work outward from the center staples, placing staples halfway between the center and corners, then filling in the spacing. Maintain consistent tension throughout to prevent uneven wrinkles.
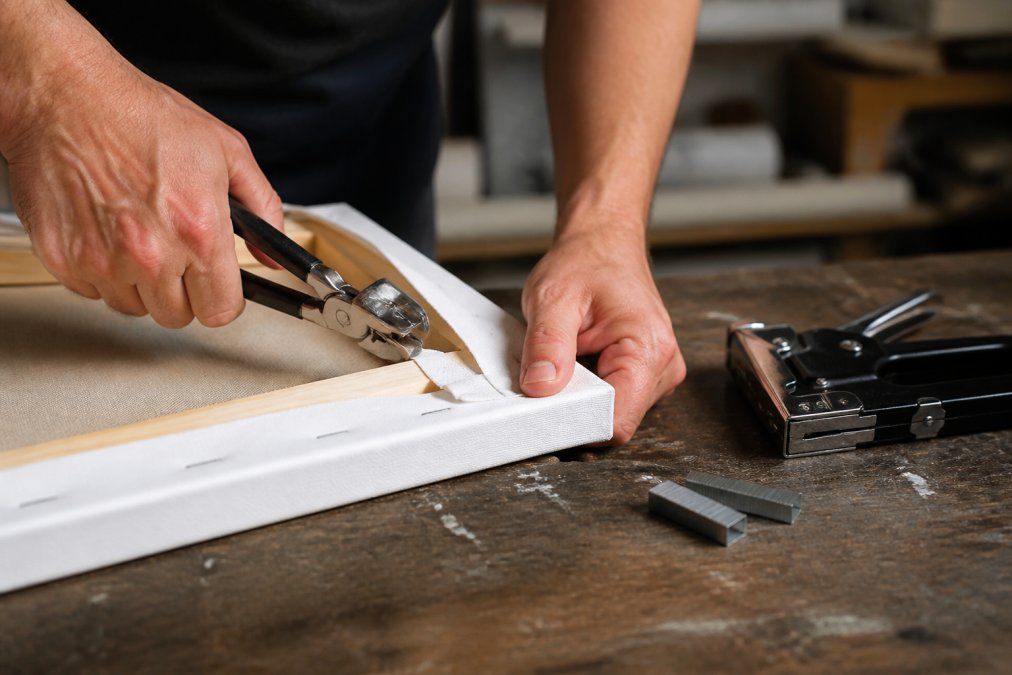
Corners require special attention. Fold the canvas at 45-degree angles to create clean, triangular flaps. Staple these flaps down, then fold the remaining canvas edge and staple again.
Step 3: Install Mounting Hardware and Backing
Once the canvas is secured, flip the frame over. Install d-rings or picture wire about one-third down from the top edge for proper balance. Drill small pilot holes before inserting screws to prevent the frame wood from splitting.
Cut acid-free backing board to fit the frame opening. Attach it with small nails or adhesive tabs around the perimeter. Never use regular cardboard; it contains acids that degrade canvas over time. Apply a dust cover over the backing board using acid-free tape. The dust cover should be breathable paper or fabric, not plastic, which traps moisture.
Step 4: Apply Protective Coating and Final Touches
Inspect the canvas front for dust or debris before displaying. Use a soft brush or lint-free cloth to gently remove particles. If your canvas has a glossy finish, consider applying a protective varnish or UV-resistant coating. Allow any protective coating to cure fully (typically 24-48 hours) before hanging.
How to Hang Canvas Without Nails: Secure Mounting Options
Adhesive wall strips (like Command strips) work for lightweight canvases under 10 pounds. Clean the wall with rubbing alcohol, let it dry completely, and press the strips firmly for 30 seconds. The advantage is reversibility; they peel off without damage.
Tension rods work for framed canvases with horizontal orientation, creating support without fasteners. Leaning frames against the wall offers another option for temporary displays. For permanent installation without drilling, French cleats attach to the frame back and wall using adhesive. Magnetic mounting systems work on metal walls or over metal studs.
Conservation and Archival Standards for Long-Lasting Canvas
Acid-free materials are fundamental. Use acid-free backing board, acid-free tape, and acid-free spacers throughout the framing process. These materials cost slightly more but dramatically extend canvas lifespan.
UV-resistant glass or acrylic protects against light-induced fading. If your canvas hangs in direct sunlight, UV protection is essential. Standard glass offers no protection; UV-blocking glass blocks 99% of ultraviolet radiation (the FDA).
Humidity and temperature stability matter significantly. Canvas expands and contracts with humidity changes, causing warping and cracking. Maintain relative humidity between 30-50% and temperature between 60-75°F (si.edu). Avoid hanging canvas near heat sources, air conditioning vents, or exterior walls.
Light exposure degrades pigments over time. Direct sunlight causes the fastest fading; indirect natural light is better. Artificial lighting with UV-filtering bulbs minimizes damage. Proper ventilation prevents moisture accumulation. Dust covers should allow air circulation; never seal a framed canvas in plastic or airtight enclosures.
Common Framing Mistakes to Avoid
Uneven canvas tension creates visible wrinkles that are nearly impossible to remove. Work slowly from the center outward, maintaining steady pressure throughout.
Using regular cardboard backing instead of acid-free board is a common cost-cutting mistake. Regular cardboard contains lignin and acids that migrate into the canvas, causing yellowing and brittleness (peer-reviewed research).
Skipping the dust cover leaves the canvas back exposed to dust, insects, and accidental damage. A simple acid-free paper cover takes minutes to install and provides years of protection.
Mounting hardware in the wrong position creates imbalance and strain on the frame. D-rings belong one-third down from the top, not at the top edge. Measure three times before ordering frames; a single dimension error cascades through the entire project.
Using the wrong wall anchors for your wall type is dangerous. Drywall anchors fail in plaster; masonry anchors don't work in drywall. Hanging canvas in direct sunlight guarantees fading. Position artwork away from windows when possible, or use UV-blocking glass if direct sunlight is unavoidable.
Properly framing canvas art transforms your space and protects your investment. The techniques covered here apply whether you're framing a piece from Ben Ledi Print Media or any canvas artwork. The difference between amateur and professional results comes down to attention to detail and using the right approach for your specific canvas and aesthetic goals. Start with quality materials, take your time with each step, and you'll achieve gallery-quality results that enhance your home for years to come.
Frequently Asked Questions
What is the difference between a floater frame and a standard frame for canvas art?
A floater frame holds the canvas edges within the frame rabbet, creating a gap that makes the artwork appear to float. Standard frames mount canvas flush against the backing board. Floater frames suit gallery wrap canvases and create a modern look with visible frame depth. Standard frames work better for traditional stretched canvas and offer a more classic appearance. Your choice depends on your canvas depth, aesthetic preference, and whether you want the frame edges visible or hidden.
How do I know if my canvas will fade or warp after framing?
Canvas quality and framing materials determine longevity. Acid-free backing boards, archival mounting methods, and protective coatings prevent fading and warping. Avoid direct sunlight exposure, which degrades pigments over time. Use tension-balanced mounting to prevent canvas sagging. Ensure proper humidity control in your space (40-60% relative humidity) to avoid moisture damage. High-quality handcrafted canvas prints use fade-resistant inks and archival materials that resist deterioration when framed correctly.
Can I hang canvas art without using nails?
Yes. Wall anchors, adhesive strips, and picture wire systems offer nail-free alternatives. Heavy-duty adhesive strips work for lighter canvases on smooth walls. Wall anchors with screws suit drywall and provide secure support. Picture wire and d-rings distribute weight across two anchor points, ideal for heavier framed canvas. Rented spaces benefit from these methods since they cause minimal wall damage. Choose your hanging method based on canvas weight, wall type, and how permanently you want to mount the artwork.
What size frame should I choose for my canvas?
Measure your canvas width and height precisely, then add the frame profile depth to determine outer dimensions. For floater frames, add twice the spacer thickness to your canvas measurements. For standard frames, the canvas should fit fully within the frame rabbet with slight clearance. Consider your wall space: a canvas should occupy 50-75% of wall area above furniture. Oversized frames overwhelm small rooms; undersized frames disappear on large walls. For specific sizing recommendations, you can consult resources that provide guidance for your space and aesthetic goals.
This article was written using GrandRanker